There are so many way to use VPN in Android Phone. Here we will show you a simple way and that is using a Small VPN Software. VPN is actually a short form of Virtual Privet Network. Lets have a look on how to use VPN in Android Phone. If you need to use VPN in your Desktop, may have a look on How to use Opera VPN.
VPN in Android Phone
VPN apps download
We will use SUperVPN free VPN Client. To get that VPN apps, first you need to open Google Play Store. Then just search there “Super VPN” and you will get a lot suggestion. From those, just choose and install SUperVPN free VPN Client as shown below image.
super vpn from google play store
As of the users Review, this app has good feedback and more then 50,000,000+ Downloads. But please be noted, this app contains Ads and will collect some information from your device like your location, Device ID & call info, Photos/Media/Files Wi-Fi Connection info etc.
Use VPN
So, after installing, open VPN app form your Android Device. May be at the very first you will find few ads as its a free vpn app. To avoid ad, they have VIP Option also that you have to perches. Follow the steps shown by the app and you will be able to use that.
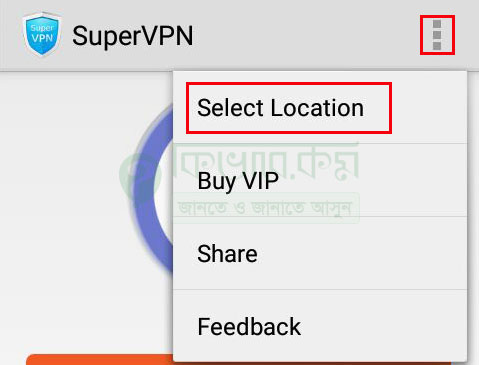
After connecting you may check your new IP and country by just visiting whatismyip.com You will be able to change your location also. To change your Virtual Location see the below image.
Change Virtual Country
As you see, at the top right part, there is a simple menu and from that you will get some option like above. Now just choose “Select Location” and then choose your Virtual Location. They will offer you only 5 country as Free user.
It happens some time that we delete unexpectedly some important image from our Phone. What if you don’t have any image backup system? Normally, you will net get back that image fine. Today, we will talk about how to recover images that you have deleted unexpectedly. And will do the delete phone recover in android phone. So, let’s get into the main topic , i.e android phone deleted photo recover.
You may have a look on how to Backup android phone contacts SMS and call log.
How to recover images in android phone
Well, we will use a photo recovery free android app to recover images in android phone. That app will find and recover Photos that has been deleted before installing the application.
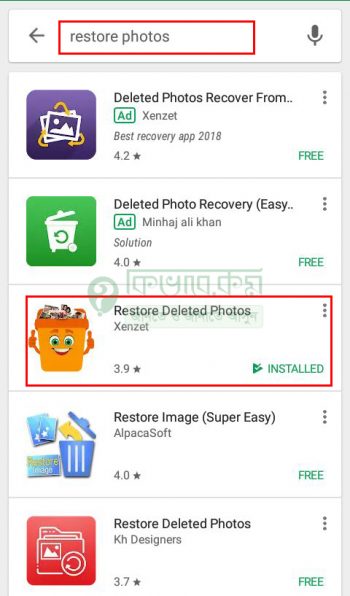
Okay, go to google play store in your smartphone with the keyword “restore photos” or “restore delete photos”. You will get a app named Restore Deleted Photos by Xenzet, Install it.
Restore delete phones
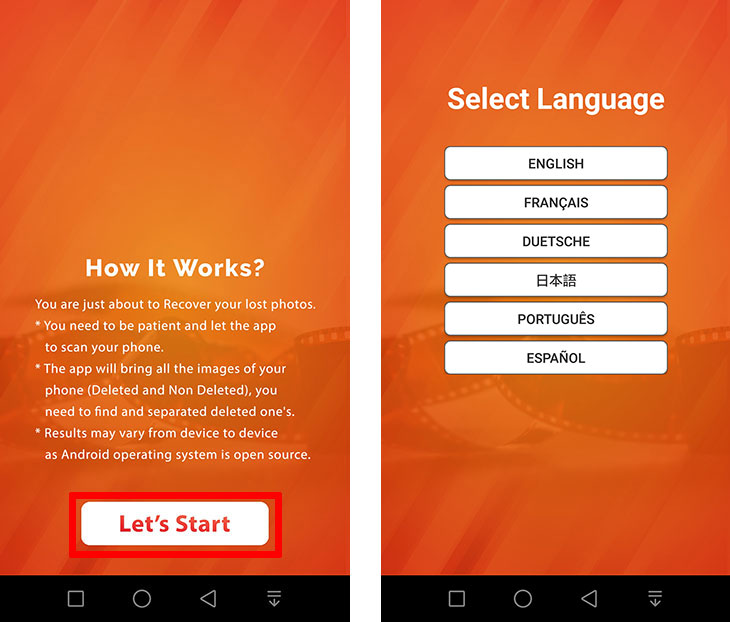
After install, open that photo recovery tools in your smartphone. Well, before Open the app, close your internet connection as it has full page ad showing problem and a bit … Anyway at first, it will show you how this photo recovery free tools works. And click to Let’s Start Button.
choose lets start and select language
And now choose your language and then choose Scan now to recover deleted files.
Scan Now
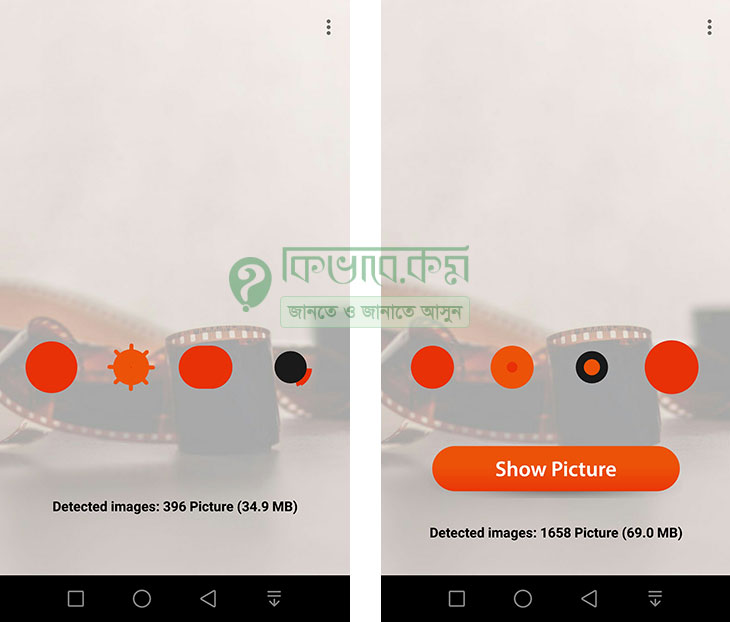
Once you choose Scan Now, it will show you a little animation like below left image and in the same time scan your phone to find out deleted image. It will scan your phone several minutes for photo restoration.
Once scan done, that animation will stop and you will get Show Pictures button.
Scan time and after finishing scan choose Show Picture
As you see in the above image, in my case, it has found 1658 picture. Well choose Show Picture and you will find all deleted image list folder wise like below image.
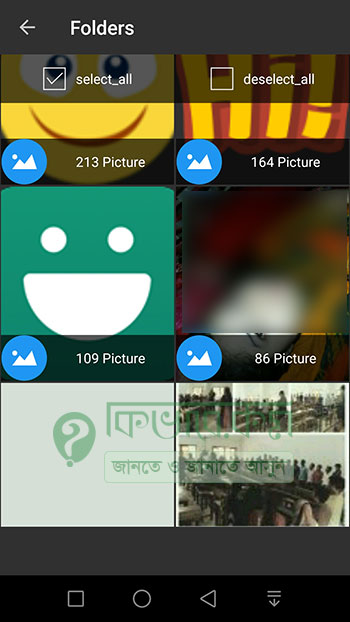
Deleted photo recover
We are almost done, As you see, there are some folder based photo list like in one folder, it found 213 picture, in another one 86 picture. Choose any folder to find our your deleted photo. If you don’t find your deleted photo, move to another folder.
recover deleted images
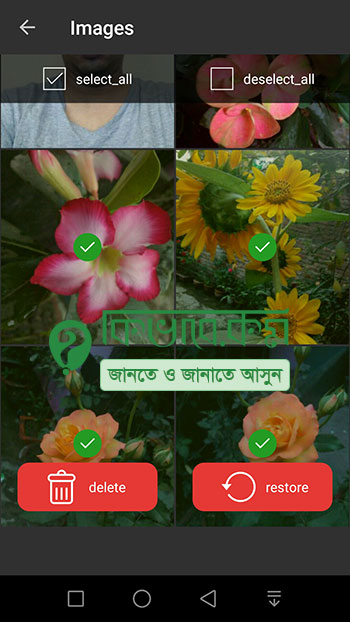
You can also select all and restore photo. In my case I have select 4 image that i want to restore.
deleted photo recover
Okay, so to restore deleted image, choose restore button and your image will be restored in a folder that you can change from settings. Well, after deleted photo recover, it will ask to you show them like below in the left image.
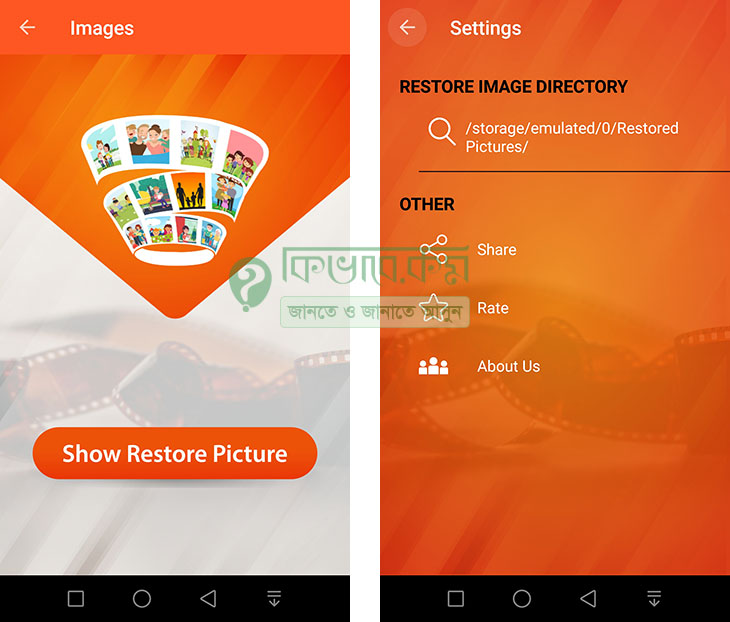
Show Restore Picture
To show restored pictures, choose Show restore picture or you can go to the folder that is used to store undeleted image. You can find that folder location under settings menu from the right top corner of the application.
Normally, this app restore photo that deleted phone memory. It should restore photo from SD card also. We will have another post delicately on how to SD restore data.
In the recent update, windows 10 come up with lot’s of new features. One of them is Directly limit your WiFi Data. May be you are using internet from your cell phone, and you have a limited data plan. Yes, its true that most of us use prepaid phones and we don’t’ want to exit our mobile data plans. And today I am gonna show you exactly how to limit data usage on windows 10.
There is a small video tutorial about how to set WiFi Data limit in Windows 10. In my case my windows is windows 10 pro . We have text based tutorial as well in details about the topic down below.
After recent update of my windows 10 professional, I found how to set data limit like for 100MB usages or may be for 3days validity like that. People doing this Over a Metered Connection but I will do it more specific.
As you already noticed, this feature added after windows 10 upgrade, hope you have the latest update on your windows 10 PC. So, first we need to choose which WiFi network we to limit.
WiFi network to limit data usage
If there is broad brand internet connection over WiFi, I don’t think you want to limit the data usage for that. Yes, if it is from cell phone, we definitely want to limit. Choose WiFi network that you are using from you mobile hotspot.
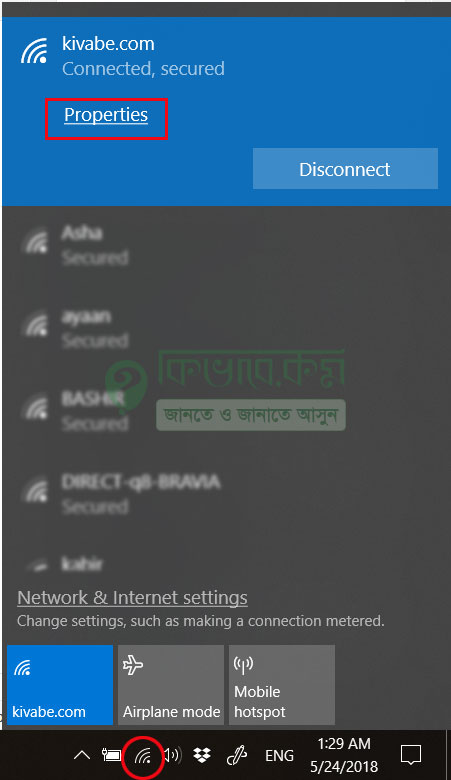
In my case, kivabe.com is from my cell phone hotsopt.
Select properties from Connected WiFI network
Form the bottom right of your PC, click to that WiFi icon and then choose the network. And then go to Properties settings.
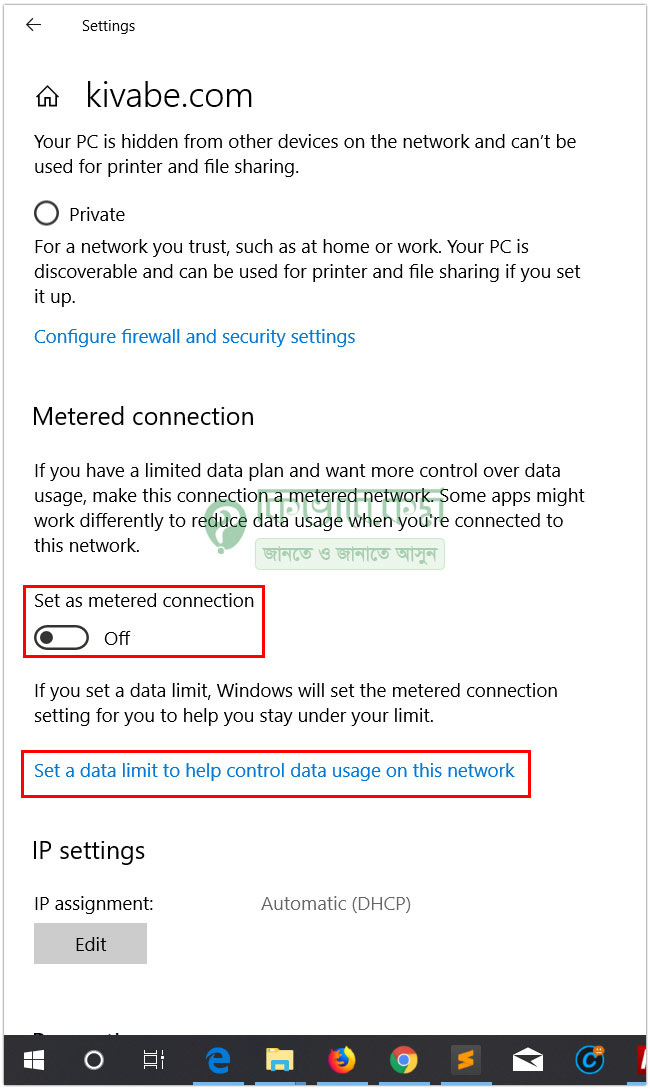
set a data limit to control data usage
As you see, turn on Set as metered connection and then choose Set a data limit ot help control data usage on this network.You will move to Data usage page.
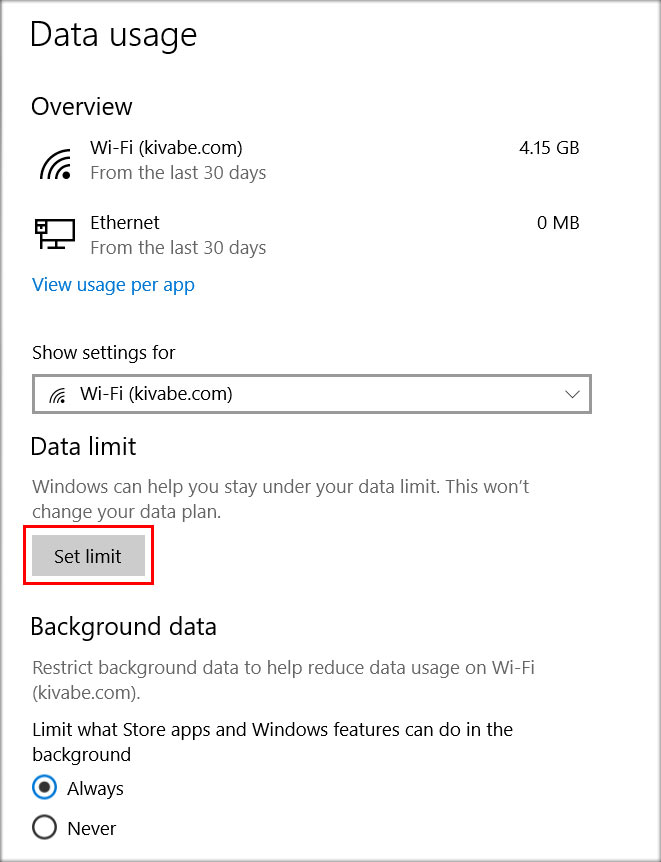
Set Data limit
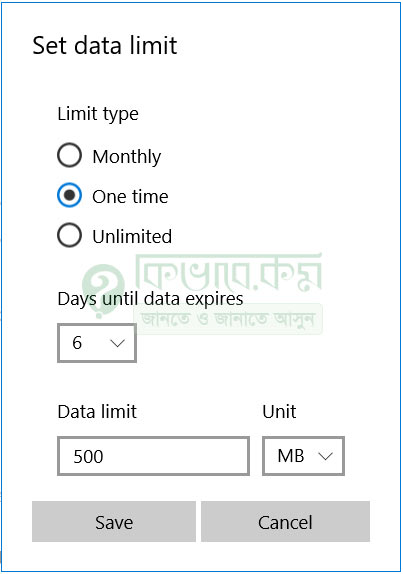
Form this part, choose Set Limit. And a small window will come to you like below.
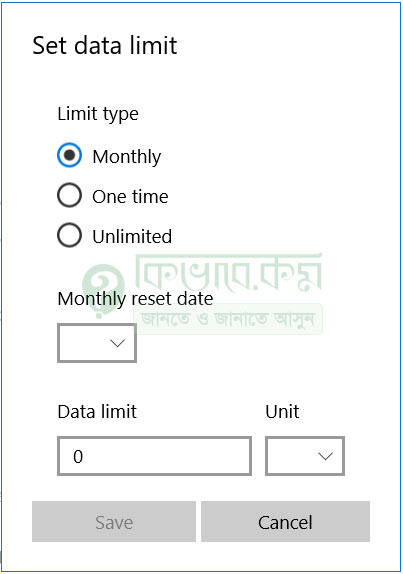
Set data limit window
This is where we will limit data usage on windows 10. So, choose accordingly as you want. I prefer One time for cell phone internet as its really limited and costly. Then choose Data limit, may be 500 and from the next box, choose Unit like MB or GB.
After set data limit
After setting data limit, it will looks like above, now Save it. Done
close the setting.
Check data usage on windows 10
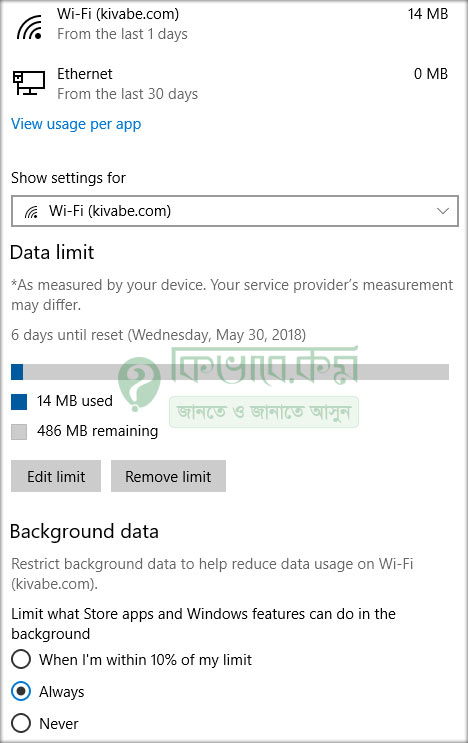
You can check how many data you have used so far. Though, system will show notification when you are about to cores the limit, we will have a look manually.
Follow all step except set data limit like above and you will get like below. Please be noted, this time, instant of Set a data limit ot help control data usage on this network, you will find Change data limit settings.
Once you are there, you will see the used and reaming data
Change data limit settings
As you can see, in my case, I have used 14MB and 486 MB data remain. If you want to Edit the limit, can do it Pressing Edit limit. Or may be you can Remove the limit also.
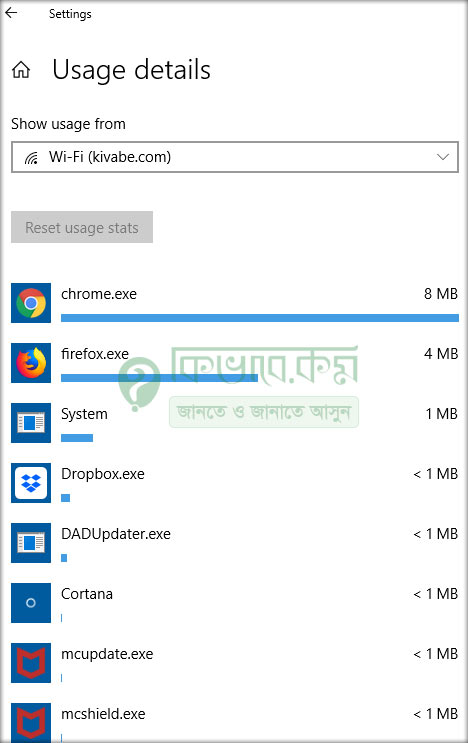
Now, there is a potion called View usage per app , click there if want to check which app using how many data from your network.
usages details
Once you reaches the data limit, system will inform you as a notification. It will not stop data connection, just show you a notification, so that you can take an action.
data limit cross notification
Not time to have a look on settings and may be time to set new limit data. I recommend to not to set all data range of your phone as limit. Keep some data and set like may be you have 1GB data in your phone. Set 800 MB in windows as data limit.
Now a days, most of us use more then one SIM. And few SIM, we do not use regularly. Some time, we get some offer for our unused sim, in Bangla known as bondho sim offer. So, today we will talk about All bondho sim offer. Banglalink bondho sim offer as well as other operator like Grameenphone, Robi, Teletalk or Airtel. So, let’s have a look step by step for each operator.
bondho sim offer
Banglalink bondho sim offer
Internet Offer of Bangla link Unused SIM
You will be eligible for these offers only if you do not use your BL connection after 18thDecember 2017 or earlier. And you connection should be Prepaid or Call & Control.
Instant 1 GB internet bonus with 15 days validity.
Recharge 23 Taka with in the first 15 days after open, you will be a change to buy 1GB internet in TK 9 with 7 days validity. But you have to recharge 9 taka additionally to avail that 1GB internet Pack.
You can get this 1GB 9 TK pack up to 11 times and once every 15 days.
Daily uses limit Maximum 350 MB
Dial *5000*109# to check internet data pack balance.
You may have a look on Bangnlalink internet offer to get more data pack offer.
Talktime Offer of Banglalink Bondho SIM
First 3 month, you can enjoy 0.5 paisa/sec talktime offer to any BL number.
1st 3 month i.e 90 days 1 paisa/sec to other network.
After 90 days, it will be 1 paisa/sec for lifetime takltime rate. If you don’t want, may unsubscribe by dialing *166*399#.
GP bondho sim offer 2018
As others, GP also have lot offer for coming back user. The best way to get informed about GP Bongho SIM offer that I recommend is check it yourself. Well, how so ? Insert your unused GP SIM into phone and dial *121# to check your offer. See the below Video for the steps.
One more way to check your unused gp offer without insert into phone is as below.
From any GP number, go to msg option > create new msg > and write msg like
bkh 017xxxxxxxx
and send it to 9999. Don’t forget to replay xxxxxxxx with your own number. You will get an reply that should show
017xxxxxxxx eligible for 500MB 3G internet at 5TK by dialing ….. Check the return message.
Have a look on GrameenPhone Internet Offer 2018
Robi bondho sim offer 2018
Come back to Robi Network and Get 1GB free internet by Recharge 29 TK. Also get 0.5 poisha call rate per second to Any Robi to Robi or Airtel local call. And for Other network, 1 poisha call rate per second.
1 GB Free internet that you got after recharge of 29 taka is only one time offer and with 7 days validity.
0.5 paisha/sec to robi or airtel and 1 poisha/sec to any other number local operator for 30days and you can avail this robi sim offer more then once.
Get 2GB on First 100 TK recharge with following benefit.
2 GB Free Internet with validity of 7 days ( one time)
0.5 paisha/sec to robi or airtel and 1 poisha/sec to any other number local operator for 30days and you can avail this robi sim offer more then once.
next month ( After 30dyas ) recharge of 29/100 TK , you will get Second & Onward 1 GB data bonus. Also you will enjoy bonus data benefit on interval of every 30days.
To Check eligibility send and SMS from your Robi number or nay other robi number as
A018xxxxxxxx to 8050. Or alternatively dial *8050# and put your unused robi number.
Teletalk bondho sim offer
Coming soon
Airtel bondho sim offer
Coming soon
Note: we are here just shearing data get form individual operator website and trying to update as well. They may change their offers any time. We recommend to you verify data with respective mobile operator to avoid any unexpected situation.
Grameenphone (GP) Bondho sim offer updated in this week. Now you can enjoy all exclusive offer if you return again in GP network. The exclusive offer is 500 MB internet Only 5 tk with best call rate offer. first time you need to check are you eligible for it or not.
Grameenphone (GP) Bondho Sim Offer
GO to Message Option >> New Message>> Type “BHK 017xxxxxxxxx” and send it “9999” (Tol Free)
500 MB 5 Tk Offer Details:
To get it dial *111*90#
Bondho Sim Offer data pack validity 7 days from activation day
Offer validity 7 days from activation day
Usable time 24 hour
Internet speed up to 2 MBPS
To check it dial *566*10#
Read More : BL Bondho Sim Offer
Bondho Sim Call Rate Offer:
Recharge 29 tk and enjoy it
GP To GP 0.5 paisa / sec
Usable time (12 am to 5 pm) hour
GP To Other 1 paisa / sec
Usable time 24 hour
Call rate offer validity 30 days
Others Conditions:
Only for Prepaid and postpaid packages
VAT+SD+SC are applicable with it
after finishing MB then you will charged by pay per usage policy
This offer until before the next notice
Dear Users if you have any problem to understand “Gp Bondho Sim Offer” then you can comment in here..
Before stepping into a blogging career, everyone is asking a general question that I will start blogging with WordPress or start with Google Blogger? Many people suggest that to get started with WordPress again, many people suggested to start blogging with Google Blogger . As a result, due to two suggestions, new bloggers can not reach the right conclusions. We will try to provide the correct and complete clear solutions to these questions. But before taking a clear idea about whether to start blogging with Blogger or WordPress, you should know the difference between WordPress.Com and WordPress.Org. In today's post we will discuss the differences and advantages of WordPress.Com and WordPress.Org and in the next post, we will discuss the details of Blogger or Perfect for WordPress.
Wordpress.Com and WordPress.Org Although this sounds like an obvious one, but there are a lot of differences between them. Before writing about these two issues, I am briefing briefly that Wordpress.Com is a free basic version of WordPress. You can use it at a free price. On the other hand, WordPress.Org is a full-fledged professional version of WordPress, which you will have to use for buying in exchange for money. You have to carry its full control and responsibility yourself.
Advantages of WordPress.Com
Here you will get free up to 3GB of free space. However, after the 3GB is completed you will have to buy the place according to your requirement.
They will backup your site regularly. You do not have to worry about this.
Disadvantages of WordPress.Com
On your blog, they will display various ads needed. In this case, if you want to remove ads, you will have to pay.
Your blog will not be able to use any kind of ads until you have more than 25,000 page views per month . Then even though ads on your blog will allow you to use, but your ads will have to pay 50% of their income.
You can not use any plugins in it. And you are aware that WordPress has the biggest advantage of the various plugins.
You can not use any Custom Theme in this way. In this case, your blog will be in big trouble to look professional.
It can not use any type of Custom Analytics Software. Because it does not allow you to use any Custom Code.
If you do any work by breaking any of their Terms of Service rules, then your site may be deleted at any time.
You can change the theme of the site without any permission. Because this theme is Full Control in the hands of the developer.
You have to pay for enjoying upgrades of your Themes. Only then will the Themes allow you to upgrade.
Advantages of WordPress.Org
You will have full control of it. You will be the only owner of all types of data. It will completely stop or keep running on your own. Nobody can interfere in any of your issues.
Can upload everything and use thousands of plugins.
Install all types of Custom Themes and Modify your choice.
You can change your hosting elsewhere at any time without any problems.
You can earn online using any type of advertisement you like.
There will be no difficulty in using Custom Analytics and Tracking.
Disadvantages of WordPress.Org
Other popular websites have to buy good quality hosting. In this case, you have to calculate monthly 03-08 dollars.
You will be responsible for all types of upgrade.
You have to bear the responsibility of Data Backup.
To protect against any type of spamming or virus attack, you must always be alert. Otherwise, your web loss may occur at any time.
Which one should you use?
If you want to use only as a personal blog, you can use WordPress.Com totally effortlessly without having to worry about earning money online in general. But if you want to get blogging as a career or want to earn money from blogging online, then of course, I would like to all say that using WordPress.Org is in exchange for some money. If you use one of the two components of the heat, it is a matter of personal concern.
The two widely used blogging platforms are "Google Blogger and WordPress". Two platforms have different advantages and disadvantages. In fact, there are two good and bad aspects of everything. In the same manner they have different distinctions between the two uses of "Google Blogger and WordPress". But the problem is that when we start blogging, I can not understand which one is suitable for me. You can not get the right decision even if you get advice from many people. Regardless of who actually speaks, you have to decide which one is appropriate for you. Because this topic will depend entirely on your blogging type. If you are blogging in Parsnali, then it will be a kind of thing. On the other hand, if you want business blogs or professional blogging, then it will be another kind.
Before selecting which blogger or WordPress will use, you need to know two things first. Today we will discuss some of the advantages and disadvantages of Google Blogger and comparisons of Blogger and WordPress. Before reading today's post, definitely know about WordPress from this link . You can easily decide whether Google Blogger or WordPress, which is suitable for you.
What is blogger (blogspot)?
Blogger is the world famous tech giant owned by Google, which is a free blogging platform. By using this platform you can create a personal blog or business blog. If you are proficient in web development, then you can create any type of website using this platform at a free price.
Difference between Blogger and WordPress
Below we present a few differences between Blogger and WordPress in Table. From this, you can understand the differences and advantages of Blogger and WordPress. ( Note: WordPress is meant only by WordPress.Org).
Domain Name
Google Blogger
WordPress
Domain name for Google Blogger will be form example.blogspot.com
You can buy it in exchange for your wishes.
If you wish you can use pre-Regester domain name.
Of course, you have to buy your own domain for 10/12 dollars.
Storage Space
Google Blogger
WordPress
Up to 1 GB of free storage space will be provided.
For monthly commute, buy a storage space of $ 4-7 for the necessary storage.
Connecting with Google+ allows you to take storage space at home.
You can take as much storage space as you want in exchange for money.
Customize
Google Blogger
WordPress
Template can be customized.
There is a chance to customize the themes.
There are no coding options available.
It can also be coding any kind of.
Design
Google Blogger
WordPress
Any kind of design can be made.
It can also be designed for any kind of design.
The drag and drop design can be easily changed using Variable.
There are many types of web design coding knowledge needed for the design.
Plugins
Google Blogger
WordPress
There is no scope to use the plugin.
Different types of plugins can be used.
It is possible to use only a few gadgets.
It is possible to use different functions.
Monetize
Google Blogger
WordPress
Have access to Google Adsense
Google Adsense has to do manually.
Any type of ad can be monitized.
It can also be used to monetize any type of ad.
Advantages of Google Blogger
Can be used at full price for free. No Hidden Charge.
It is extremely easy to use. There are not many options like WordPress. Very easy to use and manage. It is very easy to post new posts.
It is easy to create a blog with just few clicks.
If you do not have any idea about web development, then it's perfect for you. Because it can be blogging without coding.
It is possible to design blog templates using variables without customizing the blog's code .
Its SEO product is remarkable due to Blogger's own product. Because Google has made it search engine friendly by default . Very little time and little effort to get good results in search engines.
Since all the blogger's articles are managed from Google's own servers, the speed of loading them is relatively much better.
In exchange for a small amount of money you also have the opportunity to buy many premium premium templates from various web developers.
Smartphone is a blogger's special application, which allows you to easily post to your Android, iPhone.
The problem of any type of problem is easily available on the internet.
I have already said that both are goodman blogging platforms. However, you will have to spend $ 4-5 a month for a complete free hosting and the other. However, since WordPress is forced to use hosting in exchange for a compulsory payment, it will get some extra benefit compared to Blogger. But I would suggest, if you are new to blogging or want to be blogging personally, then surely you can choose Google blogger. On the other hand if you want to do business or organization or want professional blogging, then definitely using WordPress will make blogging your money. I believe if you read our two posts well, you can choose which one is right for you.
Alexa is the most used and important ranking system of current time for a blog / website rank or location. Because the Google Page Rank has not been updated over the last two years, webmasters have a greater priority for Alexa. In the last post we wrote about the importance and requirements of Alexa Ranking and how did you increase Alexa Traffic Rank ? Therefore, I do not want to write about the importance of Alexa again. However, before reading this post, please read the previous post from the link above.
To increase Alexa Traffic Rank, first you need to verify your blog on the Alexa site and verify it. Then a connection of Alexa with your blog will be created. As a result, Alexa can easily collect information about your blog.
Fill up the image form below to create an account.
After completing all the information above, click the Create an Account button in green color.
After clicking on Create an Account button, a link will be sent to your desired e-mail address. After clicking on that link, you will see the option of Password Setup for your account on the following image.
After setting up the password as shown in the above image, clicking on the Submit Password button in the blue color will create a free Alexa Account.
Then click on the Claim option from the bottom of the Alexa website or click on the Alexa Claim link directly .
After clicking the Alexa Claim link, you can see the following image.
In the above image you will see the following image by clicking the Continue button in the blue color with the Url of your desired blog.
Click on the Method2 option, rounded from the image above, you can see the image below.
Copy meta tag (full line) to the arrow in the figure above.
Then log in to Blogger Account and click on Template> Edit HTML of your desired blog.
Now press Ctrl + F from the keyboard and search the <head> section.
Then save the template by copying it under the meta tag template's <head> tag.
After saving the template, after clicking on the blue color of the image above, the image will be submitted to Alexa and you will see a Success message as shown below.
See the top image of the success blog being added to the success message. If you see the success of the above image, then your blog has been successfully linked. Otherwise you have misunderstood something else.
Asking help: A blog showing all steps step by step to verify and verify the Alexa is most simply described. We have not left any part here. If you follow all the steps in our description, then there will be no problem submitting your blog to Alexa. Even if someone has problems understanding any part of it then you can give us a comment.